My-Tiny.Net :: Networking with Virtual Machines
Setting Up the LDAP Directory
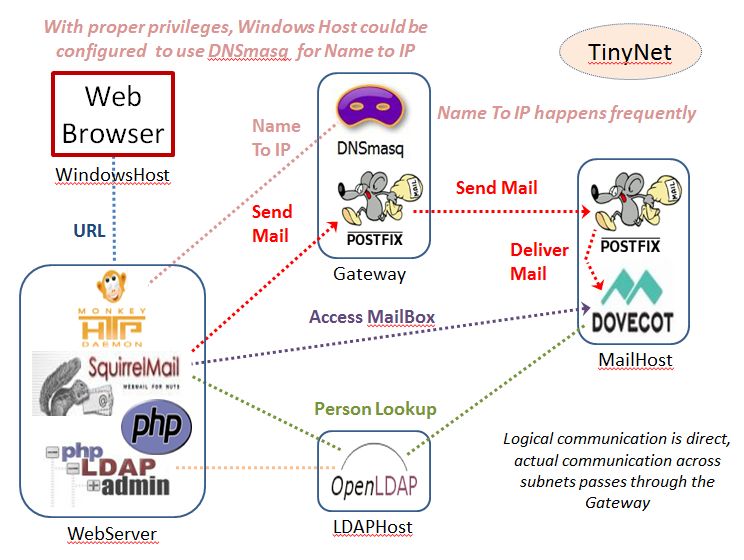
In the last Lab Exercise we finished configuration of the WebServer and got WebMail running. Here we will configure the LDAP server enough to get it on the network, and follow up with the configuration of the other servers so we can use it to manage mail accounts.
Our WebServer is now set up to use an interpreter for a programming language called PHP, and offer two PHP applications: SquirrelMail ("WebMail for Nuts", whatever that might mean) and phpLDAPadmin (referred to as "PLA" in their documentation).
LDAP stands for Lightweight Directory Access Protocol. This is used to make a centralised directory of information about people, so we can do a single update when people join or leave our organisation. One of the reasons we use Dovecot LDA for local delivery is that it will automatically create an inbox for a new user (which Postfix does not). So, once we set up the LDAP and configure Dovecot to use it, all we have to do is use PLA to add a new user to the directory, and they can send and receive mail instantly (very nice for webmail and enterprise mail systems!).
Even though the L in LDAP stands for "lightweight" it still can seem pretty heavy. Nonetheless, it is a very popular way to provide common logins across corporate networks. That makes it worth the time and effort required to get familiar with the basic concepts and terminology - these apply equally to the tiny system we set up here and Microsoft Active Directory, which is probably the most popular application of LDAP in the real world.
See LDAP Concepts under Configure LDAP on the menu for an explanation of LDAP concepts and terms.
We have one LDAP database set up already as an example, and the raw data for another one that you can use to enhance your understanding (topclass.ldif to populate the top levels of the DIT, and userdata.ldif to create some entries for testing). Before we do that though, we need to make some minor refinements to the configuration.
Get all four of your VMs running, doublecheck that your Windows host VirtualBox interface is on the same subnet as the WebServer VM, and make sure mail can be delivered (see the previous lab exercises).
Essential Configuration
Note: While there are a zillion kilometres of OpenLDAP documentation dating back 10 years, none of it seems completely accurate or absolutely complete, especially because of version incompatibilities (OpenLDAP's main rival in this dubious area is MySQL - You Have Been Warned).There is actually little to learn that is transferable from OpenLDAP to other systems except for access control and LDIF, so that's where we will focus.
OpenLDAP can use a Run-Time Configuration DIT with a hardcoded suffix of cn=config and attributes that start with olc, also known "slapd.d configuration". This allows most changes to be made without starting and stopping the LDAP server. While this is increasingly popular, it is NOT supported by PLA, so we need to stop and restart the server every time we make changes to /etc/openldap/slapd.conf
OpenLDAP ALWAYS needs a directory for data files. In our case the setup script created /var/ldapdata/ for this, and the database files for each dn (suffix) go in a new directory under here. Each of these directories needs a DB_CONFIG file; we have the necessary database configuration directives in slapd.conf so it gets created automatically.
The data directories and files must be owned by the user that slapd runs as (check the -u flag in the startup script).
Default port is 389 for ldap:// and 636 for ldaps:// (LDAP secured with TLS)
openLDAP logging can be very fine-grained - a good reference is http://www.zytrax.com/books/ldap/ch6/
What we will do here is make the changes necessary to get the server running, so we can directly access the LDAP data using PLA. Extra steps are required to get Dovecot and Squirrelmail to use LDAP to manage the mail users and mailboxes, which are detailed in the Using LDAP page under Configure LDAP on the menu. Most of these steps should be familiar.
First step: Fix the logging
- Change /var/log/slapd.log owner:group to ldap:ldap
- Edit /etc/syslog.conf and change
local4.infoto local4.*
(changes the log level for facility local4 from info to all)
- Stop and Start syslog:
/etc/rc.d/rc.syslog stop; /etc/rc.d/rc.syslog start - Edit /etc/syslog.conf and change
- Set the execute bits for everyone on /etc/rc.d/rc.slapd
- Symlink /etc/rc.d/rc.slapd as /etc/rc.d/rc.openldap so it matches /etc/rc.d/rc.inet2
There are two things to do here - the first one is simple
- Comment out (put
#in front of) the first loglevel directive, and uncomment loglevel stats
- Configure anonymous access: this is easy once you understand the concept ...
Configure Anonymous Access
To populate initial entries we can configure a rootdn and rootpw which define the DN of a superuser for each DIT that bypasses normal directory access rules. These can be commented out once we create an entry for administration in the DIT, which is better because it gives us better control (see the ACL section below).phpLDAPadmin (referred to as "PLA" in their documentation and here) relies heavily on being able to read the LDAP server schema as anonymous. LDAP servers with ACLs (Access Control Lists) must ensure that anonymous READ access to the schema is available. Anonymous read will also make SquirrelMail address books easier to manage. Dovecot does things a little bit differently and needs access to the userPassword (which our PHP applications do not) so we need to get this set up properly in our ACL for each DIT.
The relevant parts of /etc/openldap/slapd.conf on the LDAPhost are
#---%<---------------------------------------------------------------
# done with the gnarly part - what follows IS IMPORTANT
#---%<---------------------------------------------------------------

rootdn "cn=LDAPAdmin,o=tinynet.edu"
rootpw slapmesilly

access to attrs=userPassword
       by dn="cn=LDAPAdmin,o=tinynet.edu" write
       by self   write
       by *      auth

access to *
       by dn="cn=LDAPAdmin,o=tinynet.edu" write
       by self   write
       by users  read
       by *      auth
ACL directives are processed each time a directory access is made
starting with the first one defined - order is very important - and
are additive. The second adds to the functionality of the first and
so on. Each directive is implicitly terminated with by * none
which means that anything not covered by a previous clause is not
permitted.
Note that each new line within the directive must be indented by at least one space. More importantly, while the layout of the directive is very flexible you cannot put comments (lines beginning with #) anywhere in an access to directive.
The policy expressed above is to (a) allow only the root & owner to write to (update) the password, while allowing anyone else access only for authentication and (b) allow only the root & owner to update any other attribute, while allowing any authenticated user to read any attribute (except the password, which was restricted previously), and allowing access to any attribute for the purposes of authentication.
Step by step:
- access to attrs= means this policy applies only to this attribute.
- by dn="..." write is a placeholder to give write permission on this attribute to an administrator (we'll set this up later).
- by self write grants write permission on this attribute only to the owner of the entry (whoever authenticated with the userPassword of this entry) .
- by * auth grants anonymous access to this attribute only for authentication purposes. This is used internally by OpenLDAP.
- access to * means this policy applies to all attributes except userPassword because it was previously defined to have its own rules. Note that since directives are additive (but not "subtractive"), the more restrictive rule had to come before this one to have any effect.
- by dn="..." write is a placeholder to give write permission on these attributes to an administrator (we'll set this up later).
- by self write grants only the owner of the entry write permission on the attributes covered by this directive.
- by users read grants any authenticated user read permission to all the attributes covered by this directive
- by * auth grants anonymous access to any attribute for authentication purposes only
To accommodate PLA we need to change the second directive to
access to *
       by dn="cn=LDAPAdmin,o=tinynet.edu" write
       by self   write
       by *      read
which seems pretty simple now that we know what we are doing.
First steps are finished
Start openLDAP on the LDAPserver with/etc/rc.d/rc.openldap start
When the service starts correctly, it will show pid=xxx
If it does not start, it will say "check the log file and run slapd -Tt"
Do Not Ignore This Message!
If
slapd -Tt reports "unclean shutdown detected" the most likely cause is that permissions are not set correctly on /var/run - fix it quickly with chmod 1777 /var/run
If the database really is corrupted, the best thing to do is clone and configure a new VM.
|
IMPORTANT USE ONLY THIS COMMAND TO STOP LDAP /etc/rc.d/rc.openldap stopDON'T USE KILL PROCESS IN HTOP since it can damage your database |
- Try out PLA to get a feel for how the queries work
- Then configure Dovecot and SquirrelMail to use LDAP for looking up user mailboxes
- Finally, move on to adding a new DIT to the LDAP directory
Some Useful References:
phpLDAPadmin FAQ: http://phpldapadmin.sourceforge.net/wiki/index.php/FAQ
OpenLDAP: Common Errors http://www.openldap.org/doc/admin24/appendix-common-errors.html
Nice Ubuntu walkthru https://www.digitalocean.com/community/tutorials/how-to-install-and-configure-openldap-and-phpldapadmin-on-an-ubuntu-14-04-server
Excellent Demo site!! http://demo.phpldapadmin.org/RELEASE