My-Tiny.Net :: Networking with Virtual Machines
Manual Network Configuration
Now that we have created our virtual machines, we can connect them. This is an optional exercise: when we assign Roles to the TinyNet hosts this will be done automatically by the startup scripts (see Network Startup in the TinyNet Notes section of the menu), but it helps to understand how it is done before trying to read or modify the script.
When we set up the ToClone VM we went to Settings > Network and changed first network adapter to Host-Only, so this should be the setting now for all 4 VMs: Gateway, WebServer, MailHost, and LDAPhost.
If you have not done this already, at the VirtualBox main screen, highlight the Gateway VM, use the big orange icon for Settings > Network and change adapter 1 to Bridged and enable adapters 2, 3, and 4 as Host-Only.
Now, get in the habit of starting the Gateway FIRST
DO NOT START OTHER VMs UNTIL THE Gateway HAS FINISHED BOOTING
The WebServer, MailHost, and LDAPhost can all boot at the same time.
Get all 4 VMs started, and log in as root on each one.
Our goal is to have the WebServer, MailHost, and LDAPhost on different subnets, and have a Gateway interface to serve each one. It's really fairly easy. There is a quick review of the concepts at the bottom of this page.

Quick Review: IPv4 Private Network Address Ranges
   10.0.0.0 - 10.255.255.255	    10.0.0.0/8
 172.16.0.0 - 172.31.255.255	    172.16.0.0/12
192.168.0.0 - 192.168.255.255	    192.168.0.0/16
Use
ifconfig on each machine to see the network hardware
configuration (Use
ifconfig |less
for the Gateway because it usually goes off the screen at the top).
You should notice that interface lo shows an inet addr: and mask: while none of the others have his except eth0 on the Gateway, which is the Bridged adapter.
Let's make our Gateway a real Gateway.
A good shortcut to know is that you can use the [Up Arrow] key to get the last command you typed on the screen, and the [Left Arrow] to move along that command and change it with [Delete] or [BackSpace] which means a lot less typing.
Note that the number after eth on your VMs is probably different than the one in the examples below!
You can use
mytyip to see the summary (mytyip is
not a standard Linux command)
| 1. | The Gateway eth0 address is assigned by our ISP, so we don't touch it. | |
| 2. | Lets change the WebServer like this |
ifconfig eth0 192.168.56.104
|
| and the Gateway like this |
ifconfig eth1 192.168.56.101
| |
| 3. | Lets change the LDAPhost like this |
ifconfig eth0 192.168.66.104
|
| and the Gateway like this |
ifconfig eth2 192.168.66.101
| |
| 4. | Lets change the MailHost like this |
ifconfig eth0 192.168.76.104
|
| and the Gateway like this |
ifconfig eth3 192.168.76.101
| |
| 5. | Now we need to tell them how to get to the Gateway | |
| On the WebServer | route add default gw 192.168.56.101 | |
| On the LDAPhost | route add default gw 192.168.66.101 | |
| On the MailHost | route add default gw 192.168.76.101 | |
| 6. | ||
| Now we set up the Gateway to let all traffic go to all interfaces | ||
| On the Gateway | /sbin/sysctl -w net.ipv4.ip_forward=1 | |
| or, if that looks too cryptic, try | /etc/rc.d/rc.forward | |
| 7. | Check the configuration with
ifconfig and the routing tables with routeon each machine. Note that the subnet mask was automatically assigned. | |
| 8. |
Use ping
to demonstrate connectivity.
| |
Congratulations! You have a Real Network!
Sadly, all of this will disappear when the VMs are restarted - that's why we need /etc/rc.d/rc.inet1 to be executed every time we boot the system.
Quick Review of Subnets
Ethernet is by far the most common data link, or "layer 2", protocol in typical LANs. Ethernets work by passing "frames" on a shared medium according to an algorithm that attempts to be fair. While TCP/IP packets are addressed by port and IP address, Ethernet packets are addressed by a MAC (Media Access Control) address. Every Ethernet card has a unique, manufacturer-assigned MAC address that is included in the header of an Ethernet frame. This address allows Ethernet frames to be addressed to and recognized by the interface that is meant to receive it.Even though most network traffic these days uses TCP/IP or UDP/IP, those packets are still encapsulated in Ethernet frames for transport on the local network segment.
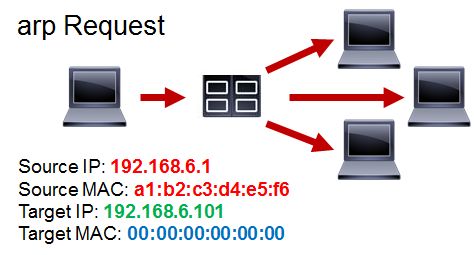
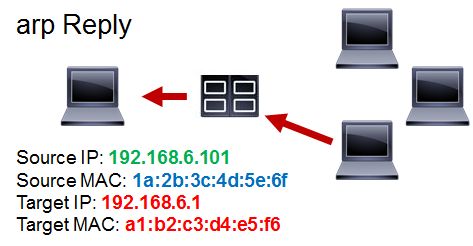
Address Resolution Protocol, or ARP, is used to to resolve a network layer address (e.g., IP address) to a link layer address (e.g., MAC address). When a host wishes to send a TCP/IP packet to a remote host, it first creates the TCP/IP packet. However, the hardware in the network interface must encapsulate the packet in a link layer frame before sending the data out on the wire. In order to assign the frame to the correct destination address, the local host uses ARP to determine which hardware address corresponds to the IP address in question. This involves sending special ARP messages called ARP Requests on the local Ethernet and receiving replies from hosts that have the answer.
For example, an application on the host 192.168.6.1 (ssh for example) wants to to send data to another host, and a DNS lookup of the target hostname returned the IP address 192.168.6.101. The sending host 192.168.6.1 needs to know what Ethernet address 192.168.6.101 has in order to put the correct MAC address in the frame header. To discover this, 192.168.0.101 needs to broadcast an ARP request to all Ethernet nodes: if it can't get that address, it CANNOT send.
|
|
In fact, every time someone needs to talk, be it to a router or another host, they have to send an ARP request. ARP requests are not sent using ports, they are sent to the MAC broadcast address because ARP is used by IP protocol to discover the relationship between MAC address (data link layer) and IP address (network layer); ports are a TCP/UDP concept (transport layer).
This is where the subnet mask (netmask) comes in: a subnet is a set of machines that should respond directly to ARP requests. The host that wants to transmit checks the destination address to see which bits match its own address and the netmask:
| My IP: | 192 | . | 168 | . | 6 | . | 1 |
| Netmask: | 255 | . | 255 | . | 255 | . | 0 |
| (rule) | (same) | . | (same) | . | (same) | . | (any) |
| dest IP: | 192 | . | 168 | . | 6 | . | 101 |
If the bits of the source and destination addresses match for all of the (same) rules, the source broadcasts an ARP Request if there is no MAC entry for the destination IP address in the ARP Table. If the destination is on a different subnet, the source checks its Routing Table for a gw entry for the network (or the default gw), and again, sends an ARP Request if there is no MAC address in the ARP Table for the gw IP address in the Routing Table.
A subnet is also known as a broadcast domain, because it limits the number of broadcast messages that will be generated. The layer 2 counterpart of a layer 3 subnet is known as a VLAN.
It is important to keep the size of a broadcast domain reasonably small, because every time a packet destined for a specific host or a broadcast address is seen, the host must handle the packet. A hardware interrupt is created, and the kernel of the operating system must read enough of the packet to determine whether or not it cares about it. Broadcast storms happen at times, when thousands of packets hit a computer every second. The kernel spends so much time handling interrupts that it doesn't have much left for dealing with "trivial" things like making sure your web server process gets a chance to run. This is the basic idea behind "Denial of Service" attacks.
So, subnets are very important because they limit the size of the broadcast domain. Subnets are determined by the netmask. Routers can be configured to pretend they are the host (called Proxy Arp), but normally the result is unreachable hosts.
If you are interested in layer 2, here are a couple of good references:
      Understanding-the-Data-Link-Layer
http://www.enterprisenetworkingplanet.com/netsp/article.php/3577261/Networking-101-Understanding-the-Data-Link-Layer.htm
      Spanning Tree
http://www.linuxplanet.com/linuxplanet/tutorials/6520/1/